Connect-85 Hardware
This page contains desings and building instructions for a Connect-85 device (to connect your TI-85 with a PC).
Copyright (C) 1995 Magnus Hagander (mha@ticalc.org). All information received from this page is used at your own risk. You may not use any information for economical profit unless you have a written agreement with
the author on it.
You can (almost) always click at an image, to receive this image in bigger size. If you want it local, make sure you save it to disk.
Please note that this hardware is compatible with the Link-85, not the TI-GraphLink. This means that it can be used with Link85x, but not with the GraphLink for Windows.
Personally, I recomment Connect-85, though.
There is likely to be some errors (mostly spelling, I'd guess). If you find one, please mail me.
Schematics of the Connect-85
Ok. Here's the schematics for the Connect-85 device.
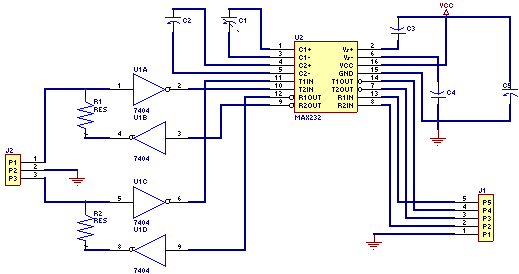 The components used are:
- U1
- 74xx04 Hex Inverter
The types 74HC04 and 74LS04 has been tested, but others, such as 74HCT04, should work too.
- U2
- MAX232CPE
This is a level-converter between the TI-85's 5-volts logic, and the +/- 10V logic of the RS-232 port on the PC. Any other converter with at least two transmitters and two receivers could probably be used, but then the PCB would ha
ve to be changed too.
- C1,C2
- 4.7uF polar capacitor
To fit the PCB, a "can"-type capacitor with pin-distance of 2.54mm must be used.
- C3,C4,C5
- 10uF polar capacitor
To fit the PCB, a "can"-type capacitor with pin-distance of 2.54mm must be used. The size of C5 is not critical, since it's only used for noice removal on the power line.
- R1,R2
- 6kohm resistor
To fit the PCB, use a 1/4W resistor. The size is not critical, but a smaller resistor will increase the power-drain of the circuit, and if it gets too large, information will be lost. 6kohm is a working size, so I recommend th
at you stick to it.
- J1
- This is the connection for the RS-232 port. On the PCB, it is available as a 5-pin SIP, so you can either use a SIP-conncetor, or just hardwire it. The pins should be connected like this:
- -> pin 7 of the RS-232 (GND)
- -> pin 20 of the RS-232 (DTR)
- -> pin 6 of the RS-232 (DSR)
- -> pin 5 of the RS-232 (CTS)
- -> pin 4 of the RS-232 (RTS)
- J2
- This is the connection to the TI-85. It is not available together, but as three single pads on the PCB. It sould be connected as follows (wires as found in the TI<->TI link cable):
- -> White wire (middle part of connector)
- -> The copper screen (inner part of connector)
- -> Red wire (tip part of connector)
PCB Layout
In the PCB layout, I have also added a few things that are not in the schematics. They are not required for the function of the device, but I still recommend them. They require the following componens (as refered to in the PCB):
- D1
- LED
This is a standard type 5mm LED (Light Emitting Diode)
- R3
- 1kohm resistor
This is also a 1/4W standard resistor. This size is not critical, it is just a current-limiter for the LED.
- U3
- 7805
This is a standard 7805 5V power regulator. Use one that comes in a TO-220, or it won't fit the board.
- C6
- 0.33uF polar capacitor
This is used to make the 7805 (U3) work better. The size is not critical. To fit the board, use a standard "can"-type capacitor with pin-distance of 2.54mm.
Ok. Now the PCB layout. We'll start with the one you use to create the circuitboard (it's a single side board):
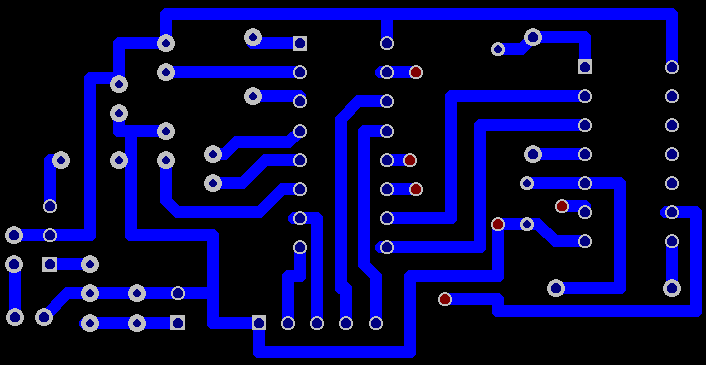
Note that when you print this picture, make sure that you scale it so that the pin distance of the IC:s is 2.54mm. If you also make sure that the pin-distance on the 5-pin SIP connection is 2.54mm, all the rest sould be correct too.
Note that this is seen from the top of the circuitboard. It will have to be mirrored to work. Though this could usually be done after the picture is printed, since you will have to use a transparent paper if it's going to work... Anyw
ay, you'll understand after checking the component placings.
Soldermask
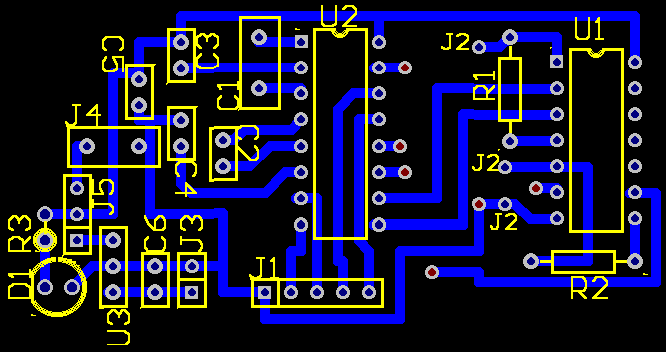
Ok. Now for the few things that have to be explained. The following designators are "new":
- J3
- This is the place where you connect the battery power (if used). This requires the 7805 and C6 to be present!
- J4
- This is the place where you connect the +5V power supply (this must be pre-stabilized).
- J5
- This is where you select which power source to use. If you connect pins 1&2 of this, external power supply will be used. If you connect 2&3, the battery will be used (with internal power regulation). If no connecion is made on this connector, the Conn
ect-85 will be deactivated.This is a good place to put an on/off switch. Just place it between the two preferred pins.
You will have to hard-wire the following connections:
- U2-15 & GND net (found at the J2 designator)
- U2-11 & U1-6
- U2-12 & U1-9 (found to the right of the SIP-5 connector)
Mounting instructinons
I recommend that you use a socket for the MAX232-circuit. The rest of the components should be a simple mounting. Mount the socket first, since the capacitors may be a little "in the way" otherwise.
The capacitors must have their positive poles at the correct side. Check the schematics for information on this. C6 shold have it's positive pole "downwards" in the figure.
The diode (D1) should have its anode to the left in the figure.
Getting the parts
Getting the parts for the link is usually quite easy, with one exception. You should be able to get all resistors, capacitors, the 74xx04 from any local electronics store.
The problem is to get hold of the MAX232CPE circuit. This is a specialised cirtcuit for voltage-conversion. It is possible that the device would run with another type of converter, but I don't know.
Thanks
The information on this page has been made possible through help from the following people: